Car Audio System Planning
What is system planning? It's the process that keeps you from making costly mistakes and ending up with equipment you don't want or can't use. Here's system planning for most car audio shoppers.
"My friend just got two fifteens for his car and it booms! I just got the same ones he bought but I bought the new gigawatt amplifier I saw in the magazines. I also bought a new head unit but I want to keep my factory speakers because I don't want to spend too much money."
Everything sounds OK until you realize that he drives a Mazda Miata and barely has enough trunk space for a bag of groceries let alone the six cubic feet those two fifteens require. Oh, and he also has a premium sound system that requires an $80 adapter to interface with the factory amplified speakers. Too bad he already opened the boxes and now they're not returnable. Time to see the chapter on selling used equipment.
So what could have prevented this? Planning. You need to know four things.
- What you want
- What you have
- What you're willing to give up to get what you want
- What you're not willing to give up
Here's how it should be done.
- I want a stereo system that sounds clean and can be heard for three blocks.
- A Honda Prelude with a factory sound system
- Money
- Trunk space for my golf clubs
Now that you know what you want you can figure out how to get it and stay within the set parameters. Here's how to go about it.
- Get the best set of component speakers you can afford and drive them with 75-150 watts of clean amplifier power. Install a high powered subwoofer system.
- Remove the factory sound system and replace it with the CD head unit of your choice making sure it has at least two sets of pre-amp outputs to allow fading between the front speakers and the subwoofers.
- Expect to pay $350+ for the component set. $200+ for the head unit. An amplifier for the component set will run $200 and up. Small box subwoofers will be $500+ per pair. Add another $100 for a custom enclosure. A high powered amp for the subs will be about $400+ with a built in crossover and one ohm stability. And don't forget $100 for wiring. Expect an installed cost of $2,000+.
- You'll need to get a subwoofer system that can fit in an enclosure small enough to allow room for your golf clubs. I'd recommend subwoofers built for small enclosures. You could get a pair of twelve inch woofers that would only require 1.5-2.0 cubic feet of space total. Maybe even a fiberglass enclosure that could be form fit to the car to really maximize available space. You'll want a large amplifier to run these woofers at high volume levels. I'd also recommend installing some sound deadening material to your car to keep the vehicle from sounding like a tin can when the system is turned up.
Make sure you take into account any vehicle limitations. This includes shallow space in the doors, bottom mount only rear deck speakers, shallow depth head unit, etc. Almost any car audio problem can be solved if you have enough money. Not enough space for large subwoofers? Add more power to smaller subwoofers. No room for a double DIN head unit in your dash? Have the dash reconstructed. If you don't have a lot of money then you need to make better buying decisions. Maybe only one subwoofer instead of two. Maybe a four channel amplifier instead of two dual channel amplifiers. A head unit without the dancing lights. One note of caution when budget shopping. Don't skimp on the speakers, especially the front speakers. If there's one thing that should be the best you can afford it's the front speakers. In my experience there is nothing else that can make or break a system like the quality of the front speaker set. The best head unit and amplifiers won't make a difference if you don't have a great front stage. Make sure quality front speakers are a part of your system plan.
Measuring Your Vehicle for A Subwoofer Enclosure
1. Use a tape measure and measure the amount of space you have to work with in your vehicle. Take width, height, and depth measurements. You may have more than one depth measurement if you're mounting your box to an angled surface (i.e. a truck box type wedge). Make sure you take into account the space you will need to place the box in the vehicle. If you have 40" of width behind the back seat but only a 36" trunk opening then you might have a problem.
2. Doing some simple geometry, determine the maximum amount of airspace these dimensions will give you (1,728 cubic inches = 1 cubic foot). You can use Blaubox if you don't want to do the math by hand. It's good for wedge boxes too and can save some time. Highly recommended.
3. Now consult the specification sheet to see how much space your subwoofers of choice need. You may find that you don't have enough air space and need to choose a different subwoofer or a lesser quantity of subwoofers.
4. If you have more space than you need (common) you have to decide what dimensions the extra space will be subtracted from. Do you want to make the box less wide, less tall or less deep? For a trunk installation I usually maximize the height and minimize the depth. Then I take off some of the width if necessary. This maximizes the usable cargo space once the enclosure is installed.
Be sure you have enough mounting depth for your woofer and that your box isn't too tall to slide into the trunk. You might test fit a piece of cardboard cut to the same size as your box's height and depth dimensions. Width won't matter for this test. If you can't slide the template into the trunk without twisting it then you need to lower your height until you can. Some rear seats fold down and you may be able to slide the box in this way instead.
5. Once you have all of the dimensions you can either manually determine the box pieces needed or use a computer program. I'd really recommend using Blaubox for this. You input the box dimensions and material thickness and it tells you what size pieces you need and how to cut them (including blade angles).
6. Once you have all of your pieces cut, your last step is to assemble it. If you've never built an enclosure before you should either consult someone who has done it (successfully) or pick up a copy of the installation video. It shows how to assemble an enclosure from scratch using nothing more sophisticated than a power drill and a jig saw (for cutting the woofer opening). It also covers carpeting of the enclosure.
Getting Your System Components to Work Together
In order to get the most out of your custom car audio system you need to do a little planning. Unlike home audio components, car audio components do not have the same connection standards, input levels and output levels. Have you ever connected a home stereo CD player to a home stereo amplifier and then had to adjust the levels to make them work? Of course not. But you will have to in car audio. I won't get into the details of each component right now but I will tell you what to look for in each component in terms of level setting.
Head Unit
| This is the term for your in-dash radio source unit, whether it be CD, cassette or whatever. The back of the aftermarket radio should have at least one pair of RCA jacks (shown below). | 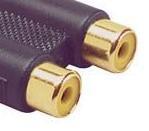 |
||
| Image courtesy of Parts Express |
|||
| If it doesn't then you will need a speaker level to RCA (low level) converter such as the one below. |  |
||
| Image courtesy of Parts Express |
|||
| The low-level music signal travels out of the radio through these jacks into RCA cables (shown below), and then on to your next component (equalizer, crossover, amplifier, etc.). | 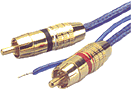 |
||
| Image courtesy of Parts Express |
|||
Most car audio components are "unbalanced" and will use these simple cables. The specification you will want to look for on the head unit is the "output voltage". The minimum is usually 0.5 volts but 2 volts and above is common in high end units. More is better in this case. You want a high output voltage to help minimize the noise in your system. A higher output voltage doesn't always mean your system noise will be lower but it helps. I would not consider a low output voltage to be a "deal killer" unless you plan on competing in car audio competitions.
Signal Processors
Crossovers, equalizers and other signal processing units will have two specifications. An input voltage and an output voltage. You want to make sure that the input section of your signal processor can handle the output voltage of your head unit. If your head unit output is 4 volts but your signal processor can only accept 2 volts then you might be in for some overload problems. As long as your head unit output voltage is within the voltage that your signal processor can handle you will be OK. Your signal processor input voltage will have an adjustment feature that will help you match the two voltages. The output voltage of the signal processor will be similar to the head unit output voltage. The more the better. It is probably less critical to have high voltage output here if your signal processor is near your amplifiers. This because there will be less chance of noise radiating into the signal cable over such a short distance.
Amplifiers
Amplifiers have an input voltage range much like signal processors. Again, you want to make sure that the input section of your amplifier can handle the output voltage of your head unit or signal processor. As long as the input voltage of the previous component doesn't exceed the range of your amplifier you should be OK.

![]()
Training DVDs
![]() Complete DVD Special
Complete DVD Special
Car Stereo Installation
Car Alarm Installation
Advanced Enclosures
Fiberglass Fabrication
Fiberglass Fabrication II
![]()
Car Audio Planning and Buying
Sample Systems
OEM Upgrades
Spotting Good Equipment
Where to Buy New
Tips for Buying New
Get the Best Retail Deal
Free Installation
Common Scams
Avoiding Bait and Switch
Mail Fraud Laws
Where to Buy Used
Tips for Buying Used
More Than You Can Afford
Buying Wholesale
Selling Used Audio
Hidden Costs
Car Audio Installation
Installation Goodies
Installations You Can Do
Car Stereo Help
Car Audio Care
Keeping Your Stereo Safe
Car Stereo Insurance
Making Your Stereo Last
Car Audio Warranties
Getting Free Repairs
Avoiding Noise Violations
Car Audio Safety
![]()
Equations
Contact
Terms of Use
Privacy Policy